Label Block
Pinwheel Quilting Quilt Shop
Hoping to inspire....
Quilting to me:
"In this crazy fast and furious world we live in I believe it is our responsibility to take time for ourselves, even if it is once a week or month. Doing what you love is one way slow the craziness down. I like to think I'm doing what I love."
Friday, January 1, 2016
Underground Railroad
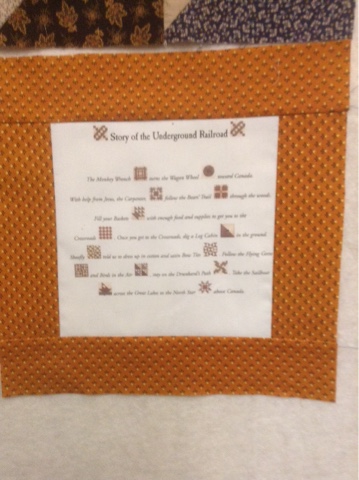
Underground Railroad Label Block
If you are making all the blocks for your quilt, then the last block is the Label Block.
This block tells the story of the Underground Railroad quilt.
I do have copies of this label printed on fabric if anyone is interested in one.
They are $5.00 and that includes shipping. Just send me a message at you would like one.
You can finish your quilt the way you like. I'm in closing a couple of pictures to give you some ideas. I will post my when I get it together. I've enjoyed doing this quilt and hope you have also.
Underground Railroad Block 15
Underground Railroad Block 15
North Star
The North Star Quilt is the tenth quilt in the secret code passed through the Williams family history. The North Star was the guiding light leading slaves to Canada and freedom. The Big Dipper always points to the North Star, which is in the handle of the Little Dipper.
The North Star was also important to navigation, especially to boat owners who took the slaves from Cleveland or Detroit to Canada.
Perhaps no song is more connected to the Underground Railroad than "Follow the Drinking Gourd" , secret music they sung behind closed doors.
Foller the drinkin' gou'd,
Foller the drinkin' gou'd;
"Foller the drinkin' gou'd."
Foller the Risen Lawd,
Foller the Risen Lawd;
The bes' thing the Wise Man say,
"Foller the Risen Lawd."
When the sun come back,
When the firs' quail call,
Then the time is come,
Foller the drinkin' gou'd.
Foller the drinkin' gou'd,
Foller the drinkin' gou'd;
For the ole man say,
Foller the drinkin' gou'd."
North Star
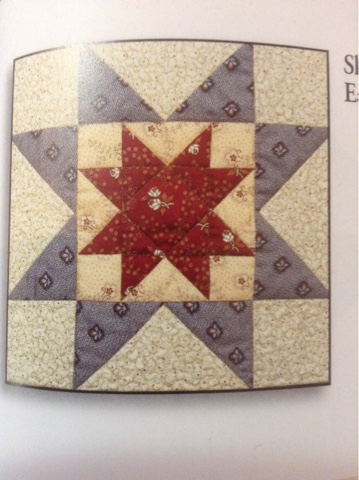
The block in the book.
This is my block.
You will need 4 fabrics.
The first fabric is the outer background fabric. Cut (1) 7 1/2" square and (4) 3 1/2" squares.
The second fabric is the inner background fabric. Cut (1) 4 1/2" square and (4) 2" squares.
Third fabric is the outer star. Cut (1) 9" square.
And the fourth fabric is the inner star. Cut (1) 6" square and (1) 3 1/2" square.
Now, to make the 4 flying geese for outer star. Using the 9" square and the 7 1/2" square, place with right sides together center the 7 1/2" squar on the 9" square. As shown above. Draw a diagonal line from point to point and then sew 1/4" seam on either side of the diagonal line.
Then cut on the drawn line.
Press seam toward larger section.
Not that you don't match up seam.
With right sides together put to 2 squares together, not matching up the seams.
Draw a diagonal line as above the stitch 1/2" on either side of line. Cut on the line. And press seams.
Before pressing seam fold triangle in half and take a snip in seam. As shown above. This will help in pressing. Repeat this step with the other half.
Now you are ready to trim. Trim 1/4" past point of flying geese. ( I like to do a scant bigger then 1/4", I find your stitching lines at the point come out a little nicer.
Then flip flying geese over and trim to 3 1/2".
Now trim sides of geese. Trim smaller side right at point.
Then flip to trim other side at the point. Piece should measure 3 1/2" X 6 1/2". Now do the other 3 the same way.
Now, you are ready to do the smaller flying geese in the smaller star. Take the 6" and the
3 1/2" squares. And you are going to make the smaller ones as you made the larger ones.
I have given you the pictures for each step.
Remember to lay squares on top of each other, not matching the seams.
Now for trimming your geese. Cut a scant larger than a 1/4" from the point of the geese.
Flip piece over and trim to 2".
Now trim at the sie point of the short side.
Then flip over geese and trim at other point. Geese should measure 2" X 3 1/2".
Your ready to lay out your pieces. Sew smaller star together then to larger star. Press seams.
V
Saturday, December 5, 2015
Underground Railroad Block 14
Underground Railroad
Block 14
Sail Boat
The Sail Boat block is a symbol of safe passage to freedom. It also represents the importance of free black sailors to the Underground Railroad.
Beginning in the 1600's, Africans were imported to New England to work s and customs of faboard whalers, fishing boats and trading vessels. The knowledge gained by black sailors of northern geography and the language and customs of free ports made them invaluable members of the Underground Railroad.
Black sailors and ship owners helped many slaves escape directly, hiding them on board their ships and spiriting them away, and indirectly, by passing on directions and sometimes messages from family members awaiting them in freedom. Sailors were often able to exchange information with enslaved blacks at port cities, forming an important link in the grapevine between slaves in the South and their free counterparts in the North.
Sail Boat
This is my Sail Boat Block.
You will need 4 fabrics: Sky, sail, boat and water. I laid mine out in the order I am going to use them.
Out of the Sail fabric cut:
2 - 4" squares
Out of the Boat fabric cut:
1 - 3 1/2" X 12 1/2" piece
Out of the Water fabric cut:
1 - 3 1/2" X 12 1/2" piece
Take the 4" squares of the sky and the sail fabric, put right sides together.
Draw a line diagonally through each square. Now sew a 1/4" on either side of the line.
Cut on the diagonal line, as shown above. Press seams towards dark fabric.
You will need 3 of these squares.
Using 3 of the half square trailer squares and 1 of the 3 1/2" squares of the sky fabric layout as above. Stitch your square together.
This is your sail square.
Using the 2 - 3 1/2" X 12 1/2" pice of the sky fabric, sew on either side of your sail square.
Press seam away from sail square.
Using the remaining 2 - 3 1/2" sky squares and the 3 1/2" X 12 1/2" boat fabric, place the squares on either end of the boat fabric.
Draw lines diagonally through the squares to make your boat. As shown above.
Stitch on drawn lines and then trim to 1/4" seam. Press seam toward boat fabric.
Layout your sections of your block as above, and sew sections together.
Subscribe to:
Comments (Atom)


